


Learn how to cook turkey breast and brown gravy in an Instant Pot or Ninja Foodi pressure cooker. This pressure cooker turkey breast is so moist and tender. The meat is seasoned perfectly with herbs and so juicy!
This Instant Pot Turkey Breast recipe is absolutely delicious and incredibly easy to make. No brining and no basting needed!
Today, I am going to share this wonderful turkey recipe. This pressure cooker turkey breast is the ultimate recipe for your stress-free Thanksgiving.
This Instant Pot Turkey Breast will save you time and energy, without sacrificing the taste! This is the easiest way to cook turkey breast on a busy Thanksgiving day!
This pressure cooker turkey breast is cooked with Ninja® Foodi™ Deluxe Pressure Cooker but also works with any other pressure cooker you may have in your kitchen, such as Instant Pot.
A great pressure cooker to speed up your meal making, slow cook to multi-task, sear, and sauté ingredients to build flavor, and create endless recipes.
Now, let's talk about the ingredients and how to cook the turkey breast on a pressure cooker.
Instant Pot Turkey Breast Ingredients:
- Turkey breast, boneless and skin on
- Garlic
- Ground mustard
- Rosemary
- Sage
- Thyme
- Paprika
- Olive oil
- Salt and Pepper
For turkey gravy, you will need the following ingredients:
- Onion
- Dry white wine
- Broth
- Rosemary
- Thyme
- Sage
- Butter
- All-purpose flour
Turkey
In this recipe, I used a small boneless turkey breast. It only weighs in at about 3 pounds.
Turkey breast is a perfect choice if your family prefers to eat white meat. This part of the turkey cooks faster than dark meat. In addition, turkey breast makes perfect leftovers for your lunch sandwiches or soup.
A three-pound turkey breast should be enough to feed up to 4 people (2 adults and 2 kids). I used a boneless turkey breast because that's the only option available in my area when looking to feed a family of my size, but feel free to use a turkey breast with bone-in as an alternative.
Serve The Turkey Breast With:
- EASY DINNER ROLLS WITH HERB BUTTER
- GREEN BEAN CASSEROLE RECIPE FROM SCRATCH
- HOMEMADE CRANBERRY SAUCE WITH ORANGE JUICE
- ROASTED SWEET POTATOES
- INSTANT POT MASHED SWEET POTATOES
- ROASTED YELLOW SQUASH WITH PARMESAN CHEESE AND HERBS
- INSTANT POT COLCANNON - IRISH MASHED POTATOES
- ROASTED BABY POTATOES WITH ROSEMARY AND GARLIC
- MOROCCAN COUSCOUS WITH CURRANTS AND PINE NUTS
- ROASTED BRUSSELS SPROUTS WITH PANCETTA AND APPLE
- HASSELBACK BUTTERNUT SQUASH WITH BROWN BUTTER SAGE
- CAULIFLOWER STUFFING (LOW CARB AND HERBY)
- BUTTERNUT SQUASH GRATIN
How Long Does It Take To Cook Turkey Breast in an Instant Pot:
Generally, a 3-pound turkey breast that is boneless will take approximately 1-¾ hours to 2 hours cooking time in the oven at 325°F.
Cooking it in a pressure cooker, however, will only require about 6-9 minutes per pound depending on the thickness! In this case, I ended up cooking this turkey breast for 20 minutes at high pressure and 15 minutes of natural release.
Safe Minimum Cooking Temperature for Turkey:
Always stay safe, per USDA recommended: A food thermometer should be used to ensure a safe minimum internal temperature of 165 °F has been reached to destroy bacteria and prevent foodborne illness.
Prepping a Turkey Breast for Pressure Cooking:
As part of the preparations, I thawed the turkey breast in the fridge for about 1 day. Generally, after thawed, turkey breast can be kept in the refrigerator for 1-2 days before cooking.
The Perfect Seasoning for Turkey:
To add fall flavor to the turkey breast, I used a generous amount of herbs to season the meat and especially the turkey skin.
I also used fresh vegetables like onion and garlic to make the brown gravy, which also helped when steaming during high-pressure cooking. The steam will help release moisture, which will add flavor and aroma to your turkey.
Herbs:
I used a combination of sage, thyme, rosemary, and paprika. I also used a small amount of dried mustard.
Cooking Turkey Breast in a Pressure Cooker:
Cooking turkey breast in a pressure cooker is beyond amazing!. It's a big timesaver that helped me create a holiday dish at a fraction of the time. It makes cooking easier than ever and is the perfect appliance for the holiday season (where many a turkey will be cooked!).
So here are some steps to follow:
Step 1. Thaw the turkey breast.
Step 2. Season the turkey breast with a homemade rub.
Step 3. Cook the gravy base.
Step 4. Cook the turkey breast at high pressure for 20 minutes.
Step 5. Crisp the turkey skin in the oven or using an "air-crisp" mode on select pressure cooker models.
Step 6. Make turkey gravy from drippings.
Check out these delicious side dish recipes:
- SUMMER SQUASH CASSEROLE - CHEESY AND HEALTHY
- ELOTES MEXICANOS - MEXICAN CORN SALAD
- EASY KETO CREAMED SPINACH - SO CHEESY!
- SKILLET FRIED CORN - BUTTERY!

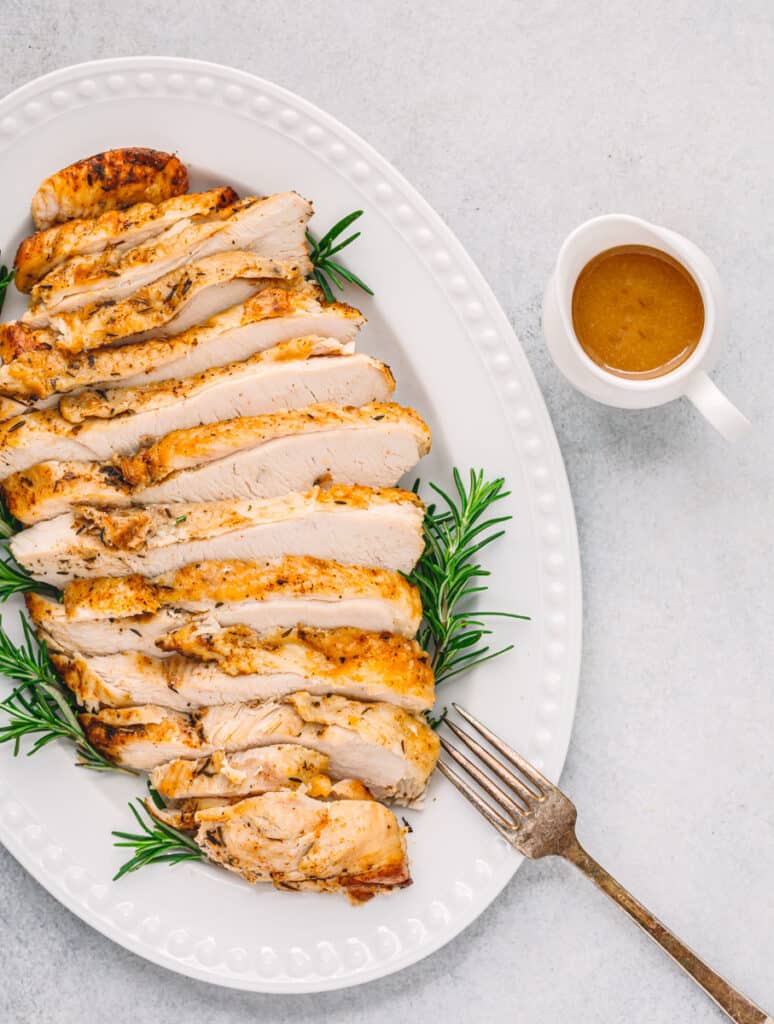
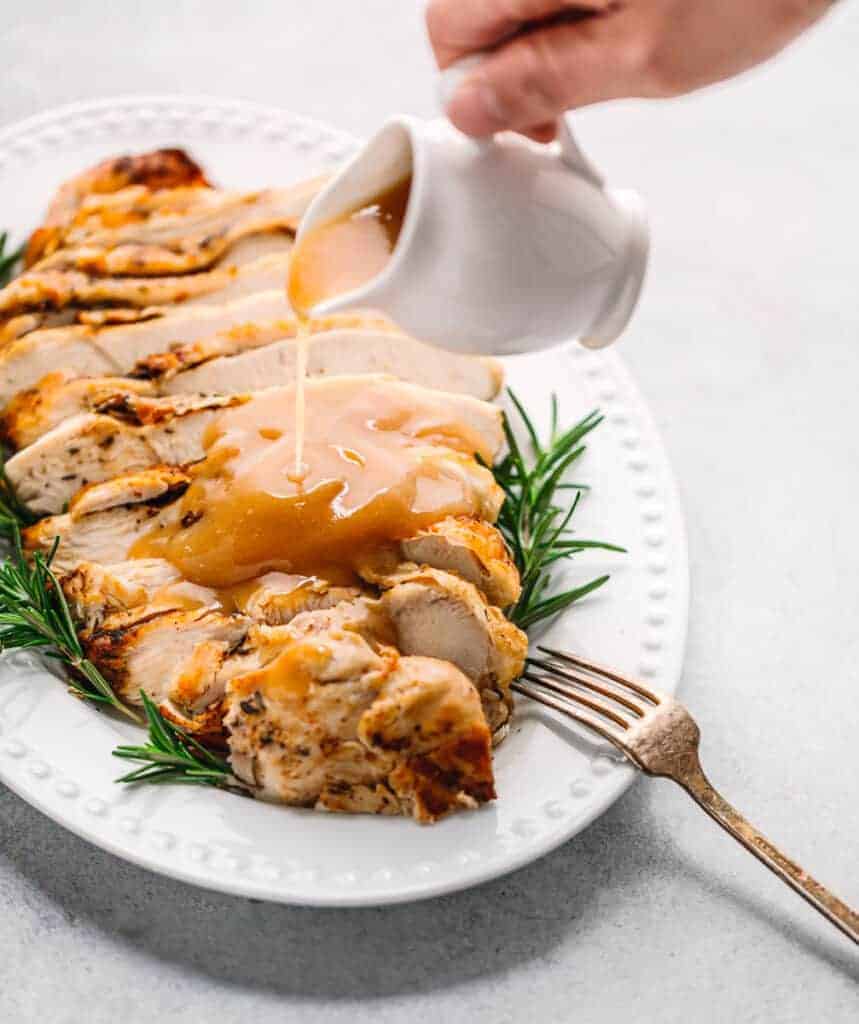
This pressure cooker does it all! The final result? We enjoyed this juicy and moist turkey breast with a perfectly browned and crispy skin outside. It was fantastic, my husband actually called his parents right away to tell them they had to try it out for themselves.
📖 Recipe

Pressure Cooker Turkey Breast
Ingredients
- 3 pounds turkey breast (boneless, skin on, thawed)
- 1 tablespoon olive oil
- 1 garlic clove (minced)
- ⅛ teaspoon ground mustard
- ½ teaspoon dried rosemary
- ½ teaspoon dried sage
- ½ teaspoon dried thyme
- 1 teaspoon paprika
- ½ teaspoon salt (about ¾ teaspoon coarse kosher salt) (or use more according to your liking)
- ¼ teaspoon pepper
- 1 medium onion (sliced)
- 6 tablespoon unsalted butter (divided)
- ½ cup dry white wine (Or skip this and use regular broth instead)
- 1 cup broth (chicken or turkey broth) (divided)
- 1 sprig rosemary
- 1 sprig thyme
- 4 small sage leaves
- 4 tablespoon all-purpose flour
- a small amount of canola oil or cooking spray (for crisping the skin)
- salt and pepper (to taste)
Method
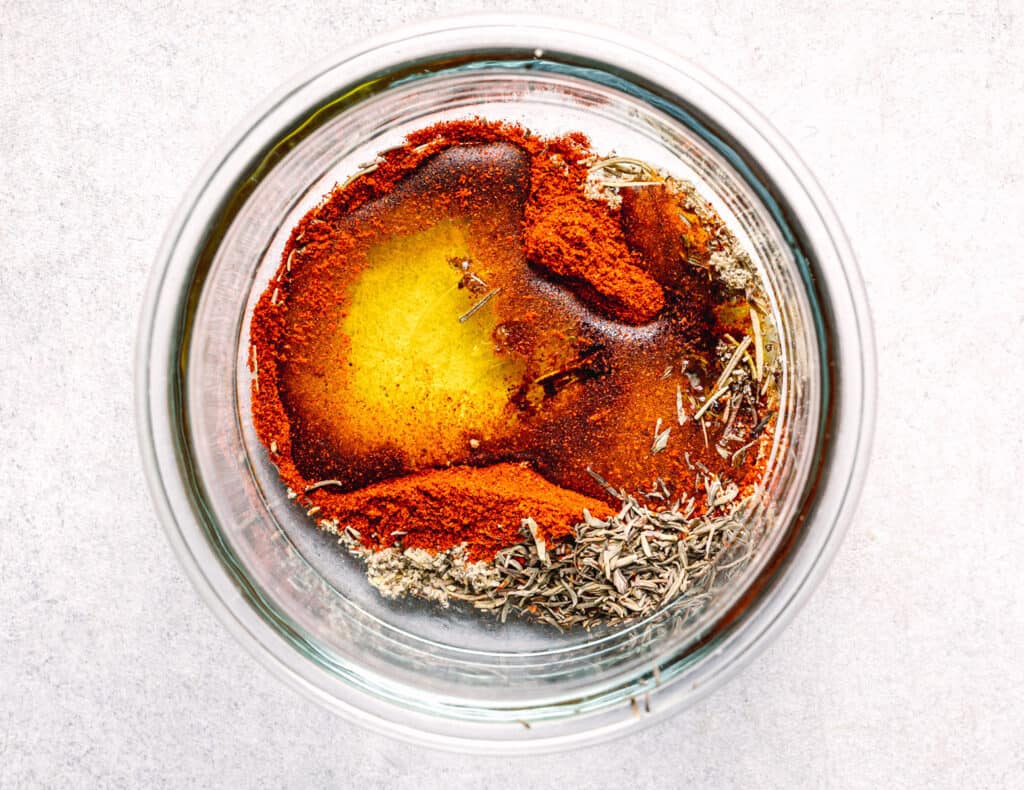
- Combine the Dry Rub: In a small bowl, combine the garlic, sage, thyme, rosemary, mustard, paprika, salt, pepper, and olive oil to make a seasoning paste.
- Rub the turkey breast with the dry rub and spread it evenly under the skin. Set aside.
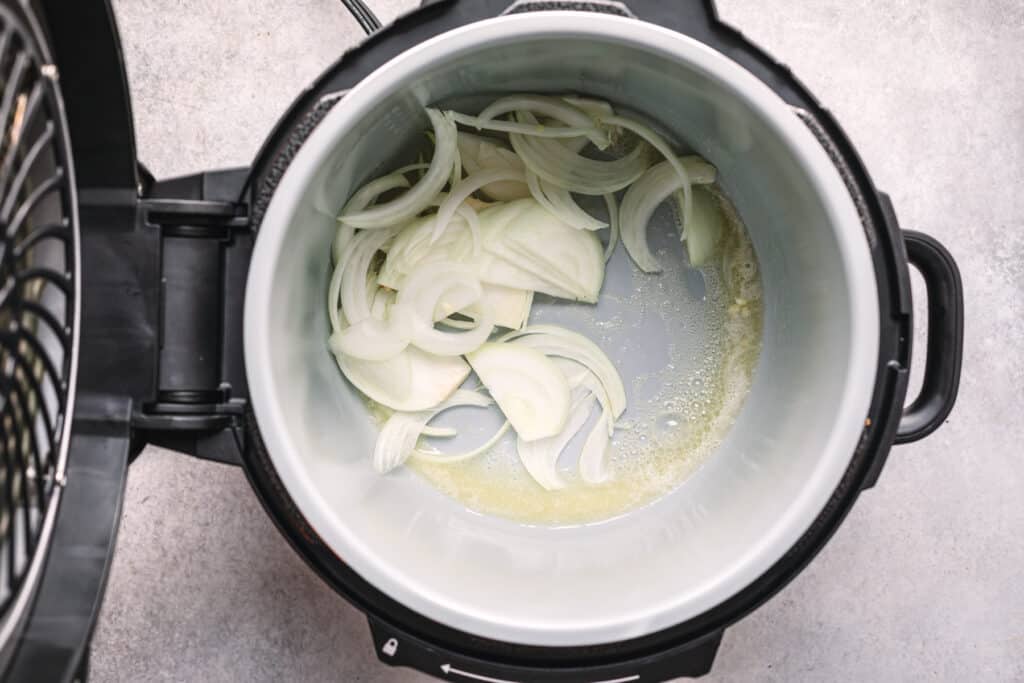
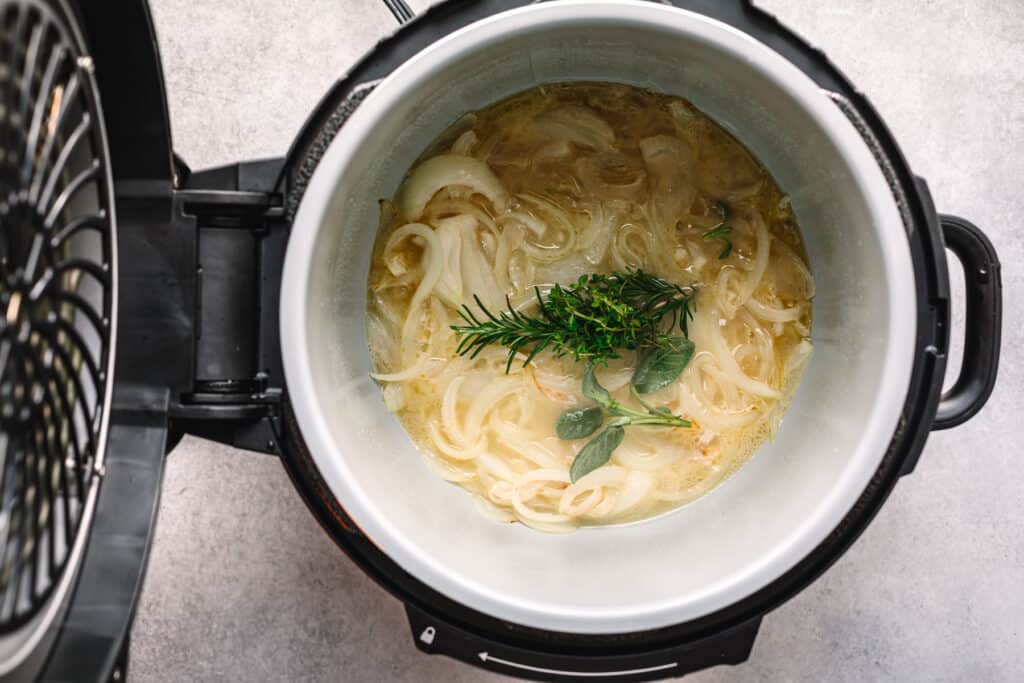
- Select SEAR/SAUTÉ, when it's hot, melt 2 tablespoon of butter. Add onion and cook just until tender. Add ½ cup of white wine, ½ cup of broth, and herbs (rosemary sprig, thyme sprig, sage leaves). Press "Keep Warm".
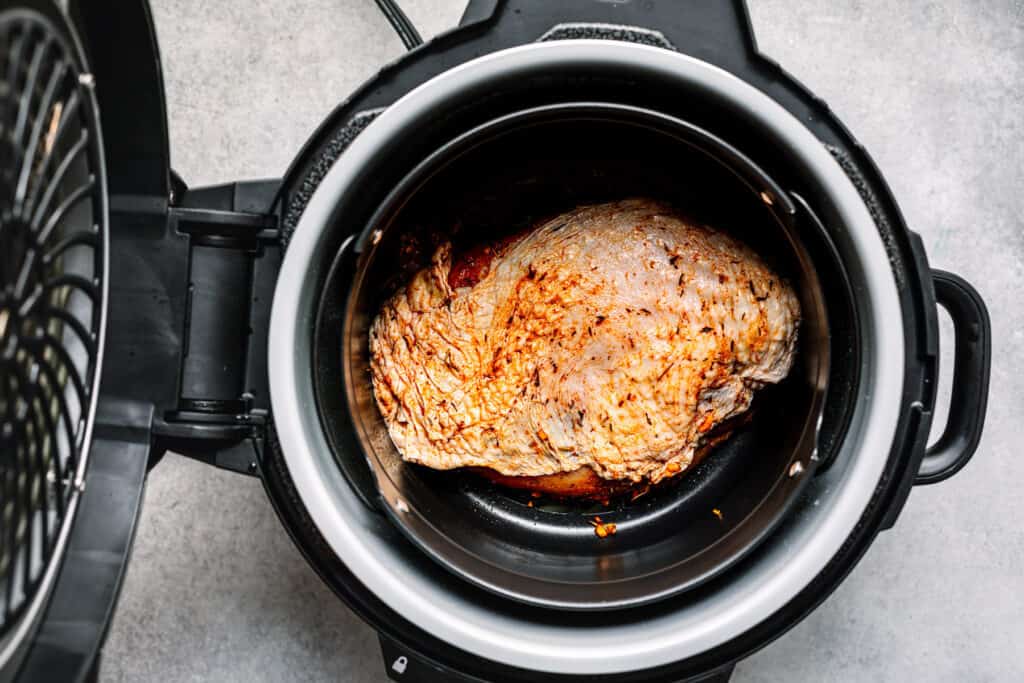
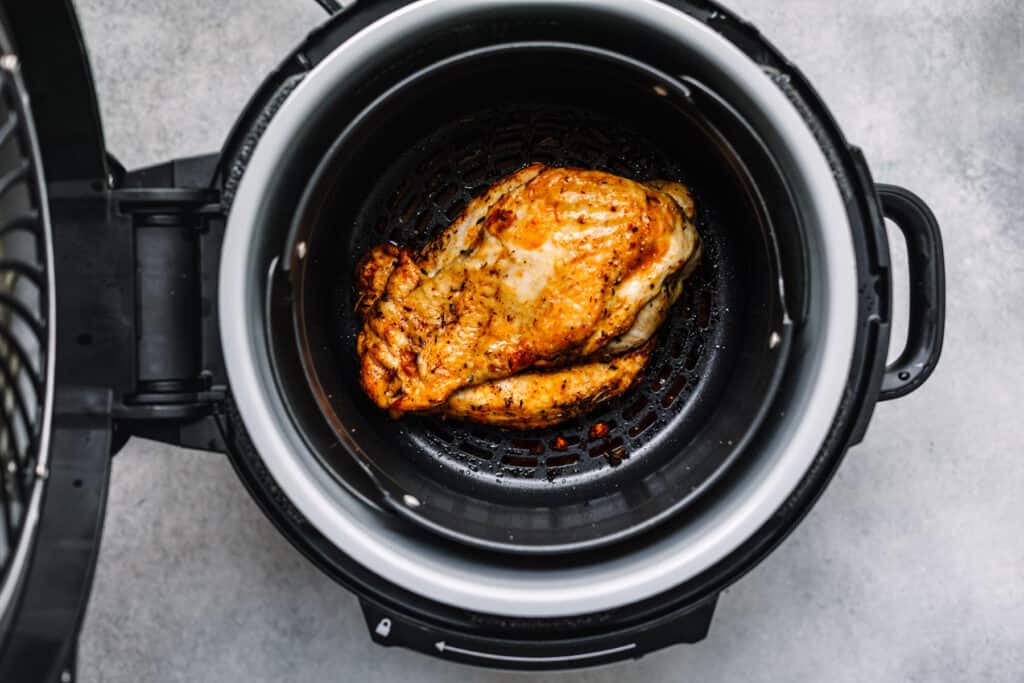
- Place the trivet (or Cook & Crisp™ Basket Ninja Foodi) to the pressure cooker, then add turkey, skin side up.
- Select "Manual" and set time to 20 minutes. When the cooking process is completed, allow pressure to natural release for 15 minutes.
- Brush the turkey skin with canola oil or spray with cooking spray. Season with salt and pepper.
- Instant Pot Users: Place the turkey breast on the mid oven shelf and broil for about 2 minutes or more or until the skin is crispy. Be sure to keep an eye on it to prevent burning. Ninja Foodi: Close crisping lid. Select AIR CRISP, set temperature to 400°F, and set time to 8 minutes. Select START/STOP to begin. Cook until the desired level of crispness is reached, adding up to 10 additional minutes.
- Let the turkey breast rest for 5-10 minutes. Cooking is complete when the internal temperature reaches 165°F. Transfer to a plate or platter.
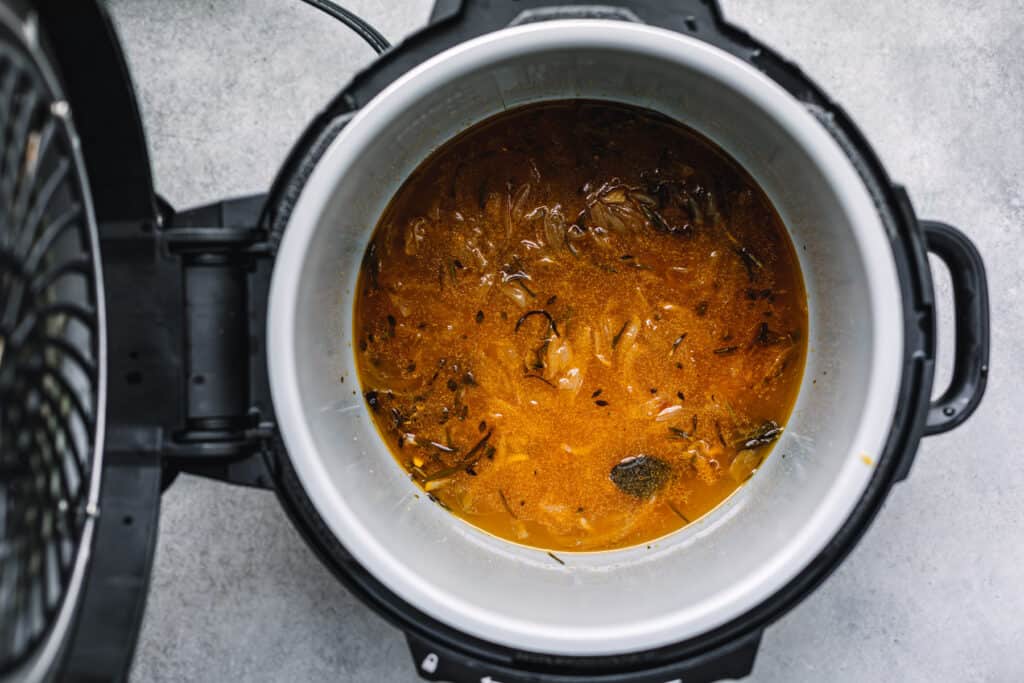
- Add ½ cup of broth and stir. Strain the drippings into a bowl and set aside.
- Select SEAR/SAUTÉ, when it's hot, melt the 4 tablespoons of butter in the pot, then add the flour. Stirring constantly for 2-3 minutes or until the flour browns slightly.
- Gradually add the strained dripping and continue cooking, frequently stirring, until the gravy is thickened. Season with salt and pepper or a dash of worcestershire sauce to taste if necessary.
Nutrition
Notes
- For safety reasons, the turkey should register at least 165ºF on an instant-read thermometer. If not, cook for 5 minutes more under HIGH pressure, then quick release again.
- If the gravy is too thick to your liking, simply add warm broth and stir to combine.
Tried this recipe?
Let us know how it was!


Swathi says
I like this juicy turkey with crispy crust. You used Instant pot and crisp lid to make a perfect turkey. I loved it.
Lynndee says
I have not tried preparing turkey before because it's always my SIL who hosts Thanksgiving. That turkey looks delish especially with the sauce.
Terri Steffes says
I would love to try this. My husband and I love turkey. Is there a reason why you used a white onion over a yellow one?
Alex says
What's the paprika for? You never mentioned in the instructions.
Rika Livingston says
Hi Alex,
Thanks for letting me know about the error. I just added the paprika in the instruction. It's for the dry rub.
Marcia L Lancaster says
Best turkey ever. I didnt get the turkey rubbed with the spices. I forgot that step, put the spices in on top of the turkey. Thank you!
Rika says
Hi Marcia,
Thanks for taking the time to share your feedback. I am glad that this turkey recipe turned out well for you. Happy Thanksgiving to you and your family!
Best,
Rika
Jennifer says
Want to try this in a few days but when it says Select "Manual" and set time to 20 minutes.
what does that mean? Do I set it to pressure high setting for 20 minutes then Natural release for 20 minutes
Rika says
Hi Jennifer,
Yes, select the "Manual" setting then adjust the time to 20 minutes on a high setting. Once the cooking is completed, you need to wait 15 minutes before releasing the remaining pressure.
Please let me know if you still have any questions.
Best,
Rika